PySide6 Widgets
URLを見ると、Using QPushButton, QCheckBox・・・とあるので、ここで一通りのGUI機能が確認できそうです。

Widgetの説明は以下のように書いてあります。
「Widgetはユーザーが操作できるUIのコンポーネントに付けられた名前です。ユーザーインターフェースは、ウィンドウ内に配置された複数のウィジェットで構成されています。」
このチュートリアルの目次は

A Quick Demo: PySide6 Widgets
まずデモとして、すべてのWidgetsを含むサンプルコードが記載されています。
- import sys
- from PySide6.QtWidgets import (
- QApplication,
- QCheckBox,
- QComboBox,
- QDateEdit,
- QDateTimeEdit,
- QDial,
- QDoubleSpinBox,
- QFontComboBox,
- QLabel,
- QLCDNumber,
- QLineEdit,
- QMainWindow,
- QProgressBar,
- QPushButton,
- QRadioButton,
- QSlider,
- QSpinBox,
- QTimeEdit,
- QVBoxLayout,
- QWidget,
- )
- class MainWindow(QMainWindow):
- def __init__(self):
- super().__init__()
- self.setWindowTitle("Widgets App")
- layout = QVBoxLayout()
- widgets = [
- QCheckBox,
- QComboBox,
- QDateEdit,
- QDateTimeEdit,
- QDial,
- QDoubleSpinBox,
- QFontComboBox,
- QLCDNumber,
- QLabel,
- QLineEdit,
- QProgressBar,
- QPushButton,
- QRadioButton,
- QSlider,
- QSpinBox,
- QTimeEdit,
- ]
- for widget in widgets:
- layout.addWidget(widget())
- central_widget = QWidget()
- central_widget.setLayout(layout)
- self.setCentralWidget(central_widget)
- app = QApplication(sys.argv)
- window = MainWindow()
- window.show()
- app.exec()
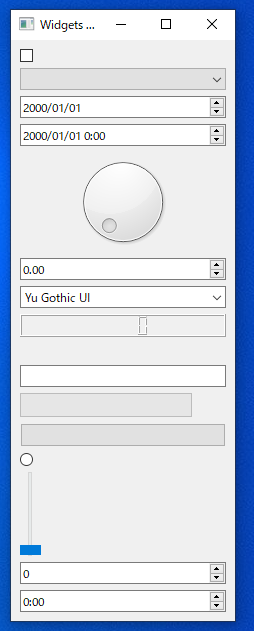
実行すると、以下のようなアプリが起動しました。(OSはWIndows10)

使用しているWedets

QLabel
QLabelはテキスト記述を設定する場合に使用します。
以下のように記述すると、Helloという文字列を持ったlabelというオブジェクトがインスタンスされます。
サンプルコードは以下のようになっており、37行目でHelloの表示位置を設定しています。
- import sys
- from PySide6.QtCore import Qt
- from PySide6.QtWidgets import (
- QApplication,
- QCheckBox,
- QComboBox,
- QDateEdit,
- QDateTimeEdit,
- QDial,
- QDoubleSpinBox,
- QFontComboBox,
- QLabel,
- QLCDNumber,
- QLineEdit,
- QMainWindow,
- QProgressBar,
- QPushButton,
- QRadioButton,
- QSlider,
- QSpinBox,
- QTimeEdit,
- QVBoxLayout,
- QWidget,
- )
- class MainWindow(QMainWindow):
- def __init__(self):
- super().__init__()
- self.setWindowTitle("My App")
- label = QLabel("Hello")
- font = label.font()
- font.setPointSize(30)
- label.setFont(font)
- label.setAlignment(
- Qt.AlignmentFlag.AlignHCenter | Qt.AlignmentFlag.AlignVCenter
- )
- self.setCentralWidget(label)
- app = QApplication(sys.argv)
- window = MainWindow()
- window.show()
- app.exec()
実行すると、以下のように中央に表示されます。

配置の種類は以下の通りです。
Qt.AlignmentFlag.AlignLeft |
左端に揃えます。 |
Qt.AlignmentFlag.AlignRight |
右端に揃えます。 |
Qt.AlignmentFlag.AlignHCenter |
使用可能なスペースの中央に水平に配置します。 |
Qt.AlignmentFlag.AlignJustify |
使用可能なスペース内でテキストを揃えます。 |
Qt.AlignmentFlag.AlignTop |
上部に揃えます。 |
Qt.AlignmentFlag.AlignBottom |
下部に揃えます。 |
Qt.AlignmentFlag.AlignVCenter |
使用可能なスペースの中央に垂直に配置されます |
両方同時に中央に揃える場合は、以下を使用します。
Qt.AlignmentFlag.AlignCenter |
水平方向と垂直方向の中央揃え |
QPixmapクラスに画像ファイル名を渡して、.setPixmap()を使用することで、画像も表示できます。サンプル画像は猫の写真があり、ダウンロードできるようですが、適当に猫の絵を描いて同じように実行してみました。
- import sys
- from PySide6.QtCore import Qt
- from PySide6.QtGui import QPixmap
- from PySide6.QtWidgets import (
- QApplication,
- QCheckBox,
- QComboBox,
- QDateEdit,
- QDateTimeEdit,
- QDial,
- QDoubleSpinBox,
- QFontComboBox,
- QLabel,
- QLCDNumber,
- QLineEdit,
- QMainWindow,
- QProgressBar,
- QPushButton,
- QRadioButton,
- QSlider,
- QSpinBox,
- QTimeEdit,
- QVBoxLayout,
- QWidget,
- )
- class MainWindow(QMainWindow):
- def __init__(self):
- super().__init__()
- self.setWindowTitle("My App")
- label = QLabel()
- label.setPixmap(QPixmap("001.png"))
- font = label.font()
- font.setPointSize(30)
- label.setFont(font)
- label.setScaledContents(True)
- label.setAlignment(
- Qt.AlignmentFlag.AlignHCenter | Qt.AlignmentFlag.AlignVCenter
- )
- self.setCentralWidget(label)
- app = QApplication(sys.argv)
- window = MainWindow()
- window.show()
- app.exec()
実行結果

QCheckBox
QCheckBoxは名前の通りチェックボックスを生成します。
サンプルコードでは、checkbox = QCheckBox()となっていたが、チェックボックスの横に文字を表示させるため、以下のように変更して実行しました。
checkbox = QCheckBox("This is a checkbox")
- import sys
- from PySide6.QtCore import Qt
- from PySide6.QtWidgets import (
- QApplication,
- QCheckBox,
- QComboBox,
- QDateEdit,
- QDateTimeEdit,
- QDial,
- QDoubleSpinBox,
- QFontComboBox,
- QLabel,
- QLCDNumber,
- QLineEdit,
- QMainWindow,
- QProgressBar,
- QPushButton,
- QRadioButton,
- QSlider,
- QSpinBox,
- QTimeEdit,
- QVBoxLayout,
- QWidget,
- )
- class MainWindow(QMainWindow):
- def __init__(self):
- super().__init__()
- self.setWindowTitle("My App")
- checkbox = QCheckBox("This is a checkbox")
- checkbox.setCheckState(Qt.CheckState.Checked)
- # For tristate: widget.setCheckState(Qt.PartiallyChecked)
- # Or: widget.setTriState(True)
- checkbox.stateChanged.connect(self.show_state)
- self.setCentralWidget(checkbox)
- def show_state(self, state):
- print(state == Qt.CheckState.Checked.value)
- print(state)
- app = QApplication(sys.argv)
- window = MainWindow()
- window.show()
- app.exec()
実行結果
Qt.CheckState.Checkedを使用しているので、最初からチェックボックスにチェックが入っています。

Qt.CheckState.Unchecked |
アイテムはチェックされていません |
Qt.CheckState.PartiallyChecked |
アイテムは部分的にチェックされています |
Qt.CheckState.Checked |
項目がチェックされています |
QComboBox()
QComboBox()はリストから一つを選択するボックスです。
- import sys
- from PySide6.QtWidgets import (
- QApplication,
- QCheckBox,
- QComboBox,
- QDateEdit,
- QDateTimeEdit,
- QDial,
- QDoubleSpinBox,
- QFontComboBox,
- QLabel,
- QLCDNumber,
- QLineEdit,
- QMainWindow,
- QProgressBar,
- QPushButton,
- QRadioButton,
- QSlider,
- QSpinBox,
- QTimeEdit,
- QVBoxLayout,
- QWidget,
- )
- class MainWindow(QMainWindow):
- def __init__(self):
- super().__init__()
- self.setWindowTitle("My App")
- combobox = QComboBox()
- combobox.addItems(["One", "Two", "Three"])
- # The default signal from currentIndexChanged sends the index
- combobox.currentIndexChanged.connect(self.index_changed)
- # The same signal can send a text string
- combobox.currentTextChanged.connect(self.text_changed)
- self.setCentralWidget(combobox)
- def index_changed(self, index): # index is an int starting from 0
- print(index)
- def text_changed(self, text): # text is a str
- print(text)
- app = QApplication(sys.argv)
- window = MainWindow()
- window.show()
- app.exec()
実行結果
oneを選択すると two threeも選択できる画面が表示され、それぞれも選択できます。


QComboBox.InsertPolicy.NoInsert |
挿入なし |
QComboBox.InsertPolicy.InsertAtTop |
最初のアイテムとして挿入 |
QComboBox.InsertPolicy.InsertAtCurrent |
現在選択されているアイテムを置き換える |
QComboBox.InsertPolicy.InsertAtBottom |
最後のアイテムの後に挿入 |
QComboBox.InsertPolicy.InsertAfterCurrent |
現在のアイテムの後に挿入 |
QComboBox.InsertPolicy.InsertBeforeCurrent |
現在のアイテムの前に挿入 |
QComboBox.InsertPolicy.InsertAlphabetically |
アルファベット順に挿入 |
QListWidget
QListWidgetはリストを表示するためのクラスです。
- import sys
- from PySide6.QtWidgets import (
- QApplication,
- QCheckBox,
- QComboBox,
- QDateEdit,
- QDateTimeEdit,
- QDial,
- QDoubleSpinBox,
- QFontComboBox,
- QLabel,
- QLCDNumber,
- QLineEdit,
- QMainWindow,
- QProgressBar,
- QPushButton,
- QRadioButton,
- QSlider,
- QSpinBox,
- QTimeEdit,
- QVBoxLayout,
- QWidget,
- QListWidget
- )
- class MainWindow(QMainWindow):
- def __init__(self):
- super().__init__()
- self.setWindowTitle("My App")
- listwidget = QListWidget()
- listwidget.addItems(["One", "Two", "Three"])
- # In QListWidget there are two separate signals for the item, and the str
- listwidget.currentItemChanged.connect(self.index_changed)
- listwidget.currentTextChanged.connect(self.text_changed)
- self.setCentralWidget(listwidget)
- def index_changed(self, index): # Not an index, index is a QListWidgetItem
- print(index.text())
- def text_changed(self, text): # text is a str
- print(text)
- app = QApplication(sys.argv)
- window = MainWindow()
- window.show()
- app.exec()
実行結果
リストが表示されました。

QlineEdit
QlineEditは1行の編集ボックスです。
- import sys
- from PySide6.QtWidgets import (
- QApplication,
- QCheckBox,
- QComboBox,
- QDateEdit,
- QDateTimeEdit,
- QDial,
- QDoubleSpinBox,
- QFontComboBox,
- QLabel,
- QLCDNumber,
- QLineEdit,
- QMainWindow,
- QProgressBar,
- QPushButton,
- QRadioButton,
- QSlider,
- QSpinBox,
- QTimeEdit,
- QVBoxLayout,
- QWidget,
- QListWidget
- )
- class MainWindow(QMainWindow):
- def __init__(self):
- super().__init__()
- self.setWindowTitle("My App")
- self.lineedit = QLineEdit()
- self.lineedit.setMaxLength(10)
- self.lineedit.setPlaceholderText("Enter your text")
- # widget.setReadOnly(True) # uncomment this to make readonly
- self.lineedit.returnPressed.connect(self.return_pressed)
- self.lineedit.selectionChanged.connect(self.selection_changed)
- self.lineedit.textChanged.connect(self.text_changed)
- self.lineedit.textEdited.connect(self.text_edited)
- self.setCentralWidget(self.lineedit)
- def return_pressed(self):
- print("Return pressed!")
- self.lineedit.setText("BOOM!")
- def selection_changed(self):
- print("Selection changed")
- print(self.lineedit.selectedText())
- def text_changed(self, text):
- print("Text changed...")
- print(text)
- def text_edited(self, text):
- print("Text edited...")
- print(text)
- app = QApplication(sys.argv)
- window = MainWindow()
- window.show()
- app.exec()
実行結果
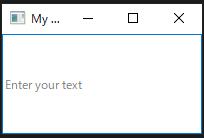
Enter your text にカーソルを持っていくと文字を入力することができました。

QSpinBox QDoubleSpinBox
QSpinBoxは矢印が描いてあるボタンをクリックして数値を設定することができます。
- import sys
- from PySide6.QtWidgets import (
- QApplication,
- QCheckBox,
- QComboBox,
- QDateEdit,
- QDateTimeEdit,
- QDial,
- QDoubleSpinBox,
- QFontComboBox,
- QLabel,
- QLCDNumber,
- QLineEdit,
- QMainWindow,
- QProgressBar,
- QPushButton,
- QRadioButton,
- QSlider,
- QSpinBox,
- QTimeEdit,
- QVBoxLayout,
- QWidget,
- QListWidget
- )
- class MainWindow(QMainWindow):
- def __init__(self):
- super().__init__()
- self.setWindowTitle("My App")
- spinbox = QSpinBox()
- # Or: doublespinbox = QDoubleSpinBox()
- spinbox.setMinimum(-10)
- spinbox.setMaximum(3)
- # Or: doublespinbox.setRange(-10, 3)
- spinbox.setPrefix("$")
- spinbox.setSuffix("c")
- spinbox.setSingleStep(3) # Or e.g. 0.5 for QDoubleSpinBox
- spinbox.valueChanged.connect(self.value_changed)
- spinbox.textChanged.connect(self.value_changed_str)
- self.setCentralWidget(spinbox)
- def value_changed(self, value):
- print(value)
- def value_changed_str(self, str_value):
- print(str_value)
- app = QApplication(sys.argv)
- window = MainWindow()
- window.show()
- app.exec()
実行結果

右上の矢印を押すとmax値として設定した3になります。
(spinbox.setSingleStep(3)と設定しているので、+3されて3になる)

QSlider
QSliderはスライドを実行すると値が更新される機能です。
- import sys
- from PySide6.QtWidgets import (
- QApplication,
- QCheckBox,
- QComboBox,
- QDateEdit,
- QDateTimeEdit,
- QDial,
- QDoubleSpinBox,
- QFontComboBox,
- QLabel,
- QLCDNumber,
- QLineEdit,
- QMainWindow,
- QProgressBar,
- QPushButton,
- QRadioButton,
- QSlider,
- QSpinBox,
- QTimeEdit,
- QVBoxLayout,
- QWidget,
- QListWidget
- )
- class MainWindow(QMainWindow):
- def __init__(self):
- super().__init__()
- self.setWindowTitle("My App")
- slider = QSlider()
- slider.setMinimum(-10)
- slider.setMaximum(3)
- # Or: widget.setRange(-10,3)
- slider.setSingleStep(3)
- slider.valueChanged.connect(self.value_changed)
- slider.sliderMoved.connect(self.slider_position)
- slider.sliderPressed.connect(self.slider_pressed)
- slider.sliderReleased.connect(self.slider_released)
- self.setCentralWidget(slider)
- def value_changed(self, value):
- print(value)
- def slider_position(self, position):
- print("position", position)
- def slider_pressed(self):
- print("Pressed!")
- def slider_released(self):
- print("Released")
- app = QApplication(sys.argv)
- window = MainWindow()
- window.show()
- app.exec()
実行結果

青い部分をクリックすると、標準出力で”Pressed”が表示されます。
そのまま下にスライドすると"position"と値が表示されます。
クリックを話すと"Released”と表示されることが確認できました。
QDial
最後がQDialです。オーディオのアナログダイヤルみたいな代物です。
- import sys
- from PySide6.QtWidgets import (
- QApplication,
- QCheckBox,
- QComboBox,
- QDateEdit,
- QDateTimeEdit,
- QDial,
- QDoubleSpinBox,
- QFontComboBox,
- QLabel,
- QLCDNumber,
- QLineEdit,
- QMainWindow,
- QProgressBar,
- QPushButton,
- QRadioButton,
- QSlider,
- QSpinBox,
- QTimeEdit,
- QVBoxLayout,
- QWidget,
- QListWidget
- )
- class MainWindow(QMainWindow):
- def __init__(self):
- super().__init__()
- self.setWindowTitle("My App")
- dial = QDial()
- dial.setRange(-10, 100)
- dial.setSingleStep(1)
- dial.valueChanged.connect(self.value_changed)
- dial.sliderMoved.connect(self.dial_position)
- dial.sliderPressed.connect(self.dial_pressed)
- dial.sliderReleased.connect(self.dial_released)
- self.setCentralWidget(dial)
- def value_changed(self, value):
- print(value)
- def dial_position(self, position):
- print("position", position)
- def dial_pressed(self):
- print("Pressed!")
- def dial_released(self):
- print("Released")
- app = QApplication(sys.argv)
- window = MainWindow()
- window.show()
- app.exec()
実行結果

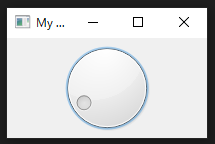
Slider同様マウスでクリックして回すとpostionと値が表示されることがわかります。
ここまでが3日目のチュートリアルでした。。